
PLC/HMI Update Procedure – Four or More Compressor Models
SUMMARY
This article contains instructions and downloadable software for updating Legacy chillers equipped with the IDEC Pentra PLC and touch screen.
MORE INFORMATION
These instructions require inserting a USB drive into the back of your chiller’s HMI Touch Screen while power is on. You should not attempt this unless you understand the potential risks of working inside a live NEMA electrical enclosure.
IMPORTANT: Not all USB (thumb drives) are the same. Quality can vary greatly and there are too many of these drives on the market to test. Legacy factory recommends the SANDISK brand to perform all chiller control updates. The SANDISK brand usb drive can be found at most electronics retailers such as BestBuy and Walmart. We have found in about 20% of the cases that a non SANDISK brand drive is used, the HMI touch screen will not acknowledge drive insertion or produce an error while performing the update. In some (rare) cases, poor quality drives can corrupt the HMI or PLC programming and require a hardware swap.
In almost all cases, to gain access to the USB slot located on the back of the USB touch screen will require remove of some or all of the sheet metal screws hold the HMI onto the electrical panel back plate. Its recommended to turn power off to the chiller while removing screws. When accessing the back of the HMI, be careful to not pull loose the HMI power or ground wire. You may need to cut one or more factory installed nylon wire ties to provide needed slack in the HMI wires. Once you have enough access to the back of the HMI to safely insert the USB drive,turn power to the chiller back on BEFORE inserting the jump drive.
In order to make performing the update as fast as possible, it is recommended to use the shortest USB drive as possible. The total update will be less than 5M so a high capacity jump drive is not needed.
Make sure to insert the jump drive direct into the USB slot proved on the back of the HMI touch screen. Do not use a hub or extension cable unless provided by Legacy Factory as part of the product.
Updating the chiller’s microprocessor software WILL NOT affect existing settings or data.
Step #1: Download the newest revision of the Legacy Chiller Systems Microprocessor Controller Software for the IDEC PLC & HMI at the bottom of this article.
Step #2: The downloadable software is provided in a ZIP Archive format. After saving the archive to your local computer, Open the archive by right-clicking the file and selecting Extract All, or by double-clicking the file to view the contents. The archive contains four files: HGAUTO.INI, HMI.ZNV and PLC.ZLD. Copy and Paste these three files to the Root Directory on your blank USB Drive. DO NOT copy the zip archive file to the USB Drive and DO NOT copy the three files to a folder or sub-folder on the USB Drive.
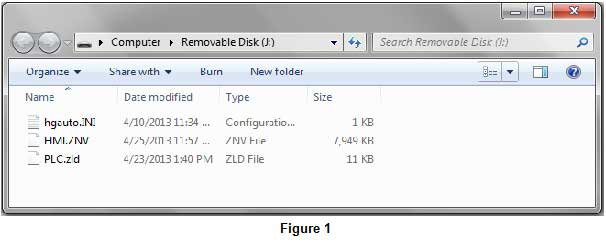
Important note: Do not modify the files names. Example, in some cases, when Windows displays the “hgauto.ini” file, the “.ini” extension my not be visible. Please do not add the extension.
Step #3: If you are replacing hardware, verify that all I/O and power connection to HMI and PLC are correct.
Step #4: If you are replacing hardware, verify that an Ethernet patch cable is installed between the HMI and the PLC.
Step #5: If you are replacing hardware, after all POWER OFF wiring checks have been performed turn on power to chiller. This will bring the PLC and HMI on-line.
 Step #6: After power has been turned on, insert the USB Drive into the USB port on the back of the HMI marked “USB2”. If you are doing a first time installation of both the HMI and PLC programs, continue with these instructions. If you are re-installing or updating the program files, please proceed to Step #7.
On first time installation when the HMI is turned on you will see the “SYSTEM MODE TOP PAGE” (Figure 2). Within 3-5 seconds of inserting the USB drive in the back of the HMI, the screen will go black for 1-2 seconds then popup the following dialog box (Figure 3).
Unlike Step #7, first time programming MUST be done in two steps:
A) Select “DOWNLOAD HMI PROGRAM” first. ** Download Password is 1122. Once this button is pressed the HMI program will immediately load. This process can take up to five minutes. During the update process the chillers cooling may go off line for up to 60 seconds. While update is proceeding DO NOT turn power off to the chiller or disturb USB jump drive. These actions may disrupt update causing a system failure. Once complete you will get a small confirmation box simply select “ACK”.
B) Next, press the “DOWNLOAD PLC PROGRAM” from the dialog box. This process will only take about 5-10 seconds. Once complete you will get a small confirmation box simply select “ACK”.
Last steps, press “Cancel” and you will return to the “SYSTEM MODE TOP PAGE” (Figure 2). From this screen press “RUN”. You should see the normal operation screen come up.
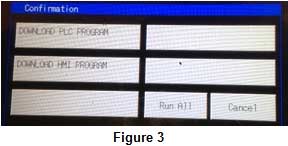 Step #7: If you are reinstalling or upgrading the HMI/PLC software simply select “RUN ALL” from the confirmation window (Figure 3) that will appear after inserting the USB drive into the back of the HMI. ** Download Password is 1122. This process will take about 90 seconds. Once complete you will get a small confirmation box simply select “ACK”.
Note: upon removing the USB Drive from the HMI, the screen will display a message: “Stop the external memory before removing the device”. Press ACK to clear the message.
APPLIES TO
All Legacy Brand process chiller shipped with the IDEC touch screen micro-processor control.
RELATED DOCUMENTS